The West Coast Trail is one of the most challenging and lengthy trails globally. It is one of the best places to gain some valuable hiking experience.
This article attempts to make the very challenging trail a little bit easier, at the very least.
Accessible only in the summer months of May through September via reservation, the West Coast Trail hike is a 75-kilometer-long stretch.
It is located on the edge of the Vancouver Islands. A part of the province of British Columbia, it is frequently visited by all wanna be west coast trail hikers from across the country, if not the world.
The Dominion Life Saving Trail was the last name of the trail. Due to the storms’ exceptionally ferocious nature, the trail is closed throughout the winter.
This is the main reason why felled driftwood trees can be found scattered all across the beaches of the West Coast Trail.
Parks Canada has been part of the Pacific Rim National Park since 1970.
The trail is littered with shipwrecks and points toward one of the main reasons why the trail was constructed in the first place.
Shipwrecks were extremely common around the area, being very close to the Graveyard of the Pacific.
There are two ways to go about west coast trail hiking. You can either start in the south and head up north, or you can start in the north and head down south.
In either case, we’ve got you covered. So without further delay, let’s cut to the chase.
The West Coast Trail: A Perfect Guide
Here is a guide that you can use when you visit the West Coast trail.
Starting North and Going South
Start your journey from the northern part of the trail and move towards the south.
Day 1
You’ll have to start in the north at the Pachena Trailhead near Bamfield near Barkley Sound. If you’re interested, you can check out Pachena Bay.
It’s not exactly on the West Coast Trail but is about ten minutes from the trailhead. You’ll have first to take care of some formalities at the registration building.
We’ll address the formalities later. But now, let’s start with hiking! The first campsite on the West Coast Trail is Michigan Creek.
It is a very flat, pleasant 12-kilometre hike from the Pachena Trailhead. This stretch is probably the easiest on all of the trails.
You can travel to Michigan Creek from the Pachena Trailhead at an average pace, which would take about 4 hours.
The beach is pretty rocky and isn’t the most scenic of stretches.
However, that’s just the unique thing about the northern campsites. About a mile from Michigan Creek, you’ll come across the Darling River and the Darling Falls.
This is where you’ll set up your first tents on the trail. About 13 miles is pretty good for the first day, and you’d be wise to rest up and prepare for the next day.
Day 2
During the second day of your hike, you’ll start from the Darling Falls and head as far down as Tsusiat Falls.
This is where the difficulty starts picking up. Have a shower in the emerald waters of the Darling Falls to freshen yourself up for another intense and challenging day of hiking.
The Kanawha River is an underrated campsite and one of the trail’s most peaceful places.
You’ll cross three other campsites on your way to Tsusiat Falls. They are Orange Juice Creek, Tsocowis Creek, and the Kanawa River.
The Kanawha River is one of the sweetest spots for lighting a campfire on the trail. You’ll come to the Tsusiat Falls about three more miles down south.
If I were you, I’d think twice before pitching a tent at the congested Tsusiat Falls. The Tsusiat Falls is the West Coast Trail’s main attraction.
Day 3
The third day is quite a bit of a challenge. That’s because Cribs Creek is 17 kilometres away from Tsusiat Falls.
The best thing about this long hike is Chez Monique’s. What’s Chez Monique’s, you ask? It’s the legend of the West Coast Trail.
They have a reputation for serving one of the best burgers on all of planet Earth. Chez Monique also sells the essentials so that you can pull yourself back from the verge of being a total savage.
After catching a break at the 44-kilometre mark, you can proceed down to Carmanah Creek, located at the 46-kilometre mark. You can also check out the Crab House if you’d like a great crab-fest for dinner.
You’ll be hiking past beaches for the most part, so it promises to be a pleasant stretch for at least a bit.
Check out the Carmanah Lighthouse and the Hole in the Wall if you’re up for cool views and rock formations.
Day 4
It is natural to assume you’ll be a bit tired from the long 17k stretch you covered the day before. So, the next day should be a bit lighter for recovery.
The stretch from Carmanah to Walbran is exactly that. The 7 kilometres between Carmanah and Walbran are some of the most scenics on the West Coast Trail.
You’ll pass by Bonilla Creek on the way, and it is easily missed due to its uninviting nature. However, if you’re up for some fun, you should try out the obstacle course at Bonilla Creek.
Once you reach Walbran Creek, you should consider swimming. The waters are deep enough, and the cable car ride across Walbran leaves this region pretty unexplored.
It’s highly recommended that you spend the night here to rest and recharge for another challenging day.
Day 5
This leads us to the West Coast Trail’s most challenging and scenic stretch. Although the distance from Walbran Creek to Cullite Cove is a mere 4.6 kilometers, it is the most testing stretch of the trail.
The most stunning campsite along the path is, without a doubt College Cove. That’s because Cullity Cove’s mornings are truly unique.
With beautiful views from every angle, ample firewood, and space for tents, it is a must to spend the night here.
There are a few sea caves on the way to Cullity, which are well worth exploring. College Cove also looks past a lot, which is why it is not very crowded when most hikers come across the cove.
Day 6
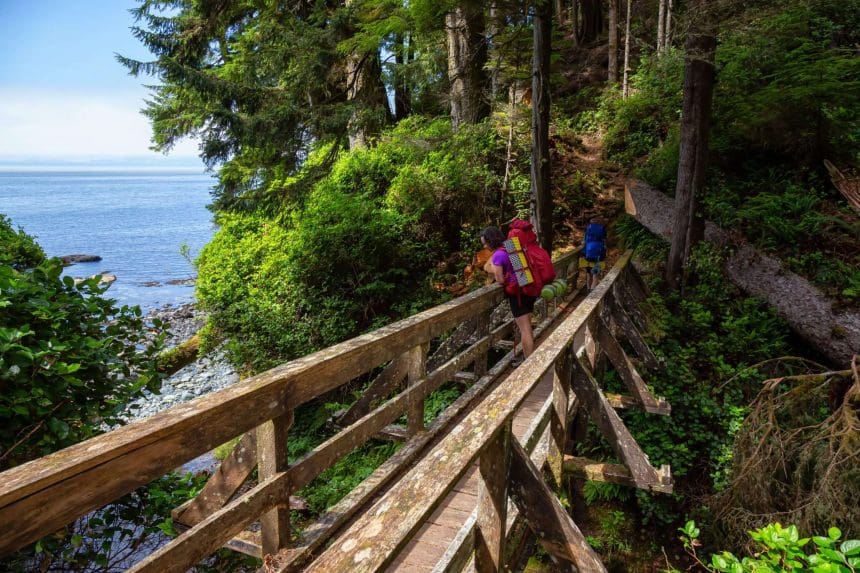
This is where the difficulty reaches its peak. People on the trail say that even the fittest people find navigating through the forest a pretty difficult task.
The ladders and the bridges through the forest make for some of the most exciting stretches on the West Coast Trail.
The distance from Cullity Cove to Camper Bay is about 4.3 kilometres, but the route’s difficulty takes a toll on the hikers. You’ll pass by people coming from the south looking fresh and energetic, which can be taken both ways, to be fair.
You’ll have to walk on the trunks of felled trees, crossing chasms and all sorts of other crazy things.
On the sixth day, there won’t be many ocean views due to the stretch of land that goes to Camper Bay being completely enclosed by woods. One of the busiest areas along the West Coast Trail is Camper’s Bay.
Although there’s a freshwater supply here, camping is a problem because of the crowd and the constant passing of boats. Most of which drop cargo by the trail every time they pass.
Day 7
And at last, we come to the home stretch. The stretch from Camper Bay to Thrasher Cove can be traveled in two different ways.
You can hike inland from Camper Bay or take the route by the sea, having a view of the Pacific. This route will eventually lead you to Thrasher Cove.
You start your day with a cable car ride at Camper Bay and reach the beach route at the 65-kilometre mark.
The scenic beach route is full of amazing places to check out. The first of the few is the Rock Shelf. You can spot marine life in the tidal pools, making for some of the most inconsistent yet serene stretches.
You can also check out the flowers at 150 Yard Creek and spend the afternoon there.
It isn’t too crowded, so you can have a rest without facing the newbie hikers, who, at this point, will come off as annoying. You can also check out the moss-covered and eroded cliffs along the water.
The waves get pretty nasty during the high tide, so it is advisable that you only hike the beach route during the middle of the low tide to ensure safety.
Once you cross the path overlooking the ocean, you’ll reach the end of the West Coast Trail at Thrasher Cove. The actual ending point of the West Coast Trail is Port Renfrew, on Port San Juan.
From South to North
There isn’t much more to add about the campsites, since they aren’t changing no matter where you come from them.
Traveling through the West Coast Trail from south to north, you’ll come across the difficult and the most scenic stretches at the beginning.
Hiking from south to north leaves you drained and weary by the middle of the trip.
That’s because it isn’t very pretty up north, and the only two decent campsites by the end of the trip would be the Kanawa River and the Tsusiat Falls.
It would be better to start the hike on a calmer note and gradually increase the difficulty as you go from north to south. Instead of draining yourself with the most thrilling stretches behind you.
Wildlife
You’ll see a decent amount of wildlife during your week-long hike along the West Coast Trail. Eagles, black bears, hummingbirds, and wolves are some of the most notable species you’ll come across on the land.
Dealing with dangerous animals like bears, cougars, and wolves is a fundamental part of the orientation program that all hikers must participate in before they hike along the West Coast Trail.
There’s also a fair amount of whale watching that you can do here. Orcas, grey whales, sea lions, and seals are some of the more prominent marine animals you will encounter.
Additional Information About the Campsites
Almost every campsite is close to at least one shipwreck site, which is one of the most distinguishing features of the West Coast Trail.
You can even camp off the official campsites, but it is much harder without the basic amenities.
That’s why if you are visiting Gordon river, west coast trail express, or plan to do the west coast trail overnight, it is imperative that you take all the amenities and equipment you might need for the entire trail.
The campsites are ideal for spending the night in the availability of toilets, bear-proof food lockers, and access to fresh water. All you need to do before you set out on the west coast trail hike west coast trail reservations.
Most campsites also have a lifeguard because the number of hikers that have to be evacuated off the West Coast Trail due to medical emergencies is more than you would imagine.
It would help if you stacked up on food for the trip’s totality, as the food sources fit for consumption are served at Chez Monique’s and the crab shack.
This west coast trail cost, takes about $320 per head a hike the West Coast Trail. With bus rides through and from the starting points charging extra.
You can also drive to the Pachena Trailhead or the Thrasher Cove and leave your car for a nominal parking fee.
People must register with Parks Canada before the trip because the West Coast Trail is only accessible via reservation and don’t to the official west coast trail map with you.
Closing Thoughts
Before hiking on the West Coast Trail, it is mandatory to attend the orientation provided by the authorities.
It is one of the toughest trails in the world, and things can become risky if you’re not careful. This is the board’s way of ensuring you’re up for the hike.
Read more about the amazing things on your west coast trail travels in the province of British Columbia right here.

Last Updated on by Sanjana